Mounting a projector on the ceiling can transform any room into a cinematic experience, offering a dedicated viewing area free from obstructed sightlines and interference. This process not only saves valuable floor space but also enhances the aesthetic appeal of your room by providing a streamlined look. Ceiling mounting a projector is a popular choice for home theaters, conference rooms, and classrooms, as it allows for optimal viewing angles and a clutter-free environment.
The process of ceiling mounting a projector, however, can be daunting, especially for those new to DIY projects. It involves several key considerations, such as selecting the right projector mount suited for yours, understanding the ceiling structure, and ensuring proper cable management. By following a systematic approach, you can achieve a professional and secure installation.
This guide will walk you through the essentials of choosing, positioning, and mounting a projector on the ceiling. It will cover pre-installation considerations, such as projector type and weight, ceiling type and structure, and viewing angle and screen placement. Additionally, it will provide step-by-step instructions for the installation process, from locating ceiling joists to testing the final setup. For those who prefer non-invasive methods, alternative solutions like tension rods, ceiling clamps, and adhesive hooks will also be discussed.
Whether you’re a homeowner looking to enhance your entertainment system or a renter seeking a temporary setup without drilling, this guide offers practical solutions to meet your needs. By leveraging expert insights and best practices, you can create a sleek and immersive viewing experience that will provide years of enjoyment.
For more detailed instructions and tips, you can refer to resources such as Dangbei’s Step-by-Step Guide and NextTools’ Comprehensive Guide. These guides offer valuable insights into the installation process and highlight the benefits of ceiling mounting a projector.
Pre-Installation Considerations for Mounting a Projector from the Ceiling
Assessing Ceiling Structure and Weight Capacity
Before you even think about grabbing that drill, it’s crucial to assess whether your ceiling can handle the weight of a projector and its mount. Think of it as a first date; you want to make sure everything is compatible before committing. The ceiling’s weight capacity is essential to ensure a safe installation. For example, a drop ceiling might not be as strong as a solid concrete ceiling. Consulting a professional contractor or checking the original construction plans can provide insights into the maximum weight your ceiling can support. Remember, you don’t want your projector to make an unexpected descent during movie night! (Easy Tech Solver)
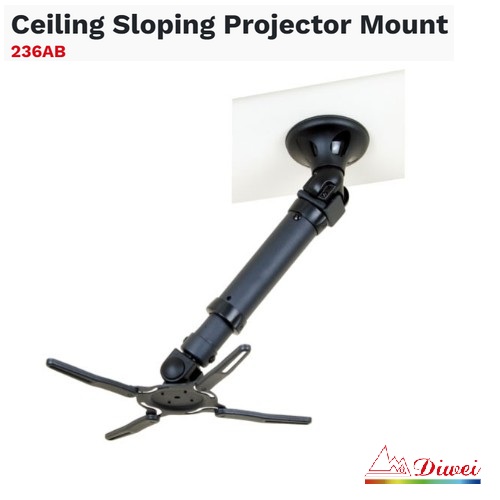
Choosing the Right Mount Kit
Not all mounts are created equal, much like not all superheroes wear capes. Selecting the right ceiling mount kit is pivotal. Consider factors such as the projector’s weight, size, and mounting requirements. Fixed mounts offer stability, tilt mounts allow angle adjustments, and swing-arm mounts provide flexibility. Ensure the mount is compatible with both the projector and the ceiling type. It’s like finding the perfect pair of shoes; it needs to fit just right! (NextTools)
Locating Ceiling Joists
Finding ceiling joists is akin to a treasure hunt, but instead of gold, you’re searching for sturdy support. Use a stud finder to locate these joists, as they provide the necessary strength for securely anchoring the mount. Mark the location with a pencil or marker to avoid drilling into a no-go zone. Avoid areas near electrical or plumbing components because, let’s face it, nobody wants a shocking surprise! (Robots.net)
Clearing the Installation Area
Before you start, ensure the installation area is as clear as a summer sky. Remove any furniture or objects that might obstruct access to the ceiling. A clean, clutter-free workspace facilitates the installation process. Place a drop cloth or plastic sheet on the floor to protect it from any dust or debris that might fall during the installation. It’s like setting the stage for a performance; everything needs to be in its place. (Robots.net)
Safety Precautions
Safety first, folks! When mounting a projector, ensure the mount is securely attached to the ceiling and can support the projector’s weight. Use a sturdy ladder or lift, and always follow the manufacturer’s instructions. It’s also wise to have a second person assist with the installation for additional support and safety. After all, teamwork makes the dream work, especially when it involves heavy lifting! (ViewSonic User Guide Database)
By considering these pre-installation factors, you can ensure a smooth and secure projector mounting experience. Remember, preparation is key, and with the right planning, you can achieve a professional-looking installation that will make your home theater the envy of all your friends.
Installation Steps for Mounting a Projector from the Ceiling
Step 1: Selecting the Ideal Location
Finding the perfect spot for your projector is like choosing the right seat in a movie theater—except this time, you’re the one responsible for the popcorn too! The location should ensure the projector’s image aligns perfectly with your screen, avoiding any awkward neck-craning. Measure twice, drill once, as they say. Ensure the projector is at the correct distance from the screen to achieve the desired image size. For more details on finding the right spot, check out this comprehensive guide on NextTools.
Step 2: Marking the Mounting Points
Once you’ve picked the prime real estate on your ceiling, it’s time to mark your territory. Use a pencil to mark where the mount will be installed. This is where your inner artist can shine—just don’t get too carried away with doodles. Ensure the marks are aligned with the ceiling joists for a secure installation. If you’re unsure about locating joists, a stud finder can be your best friend. For a detailed walkthrough, visit Mount-It!.
Step 3: Drilling Pilot Holes
Now comes the moment of truth—drilling. This step is not just about making holes; it’s about making the right holes. Drill pilot holes at the marked points to ensure the screws go in smoothly without splitting the wood. Remember, it’s not about brute force; it’s about finesse. Use a drill bit slightly smaller than your screws for the best results. For more drilling tips, see Dangbei’s guide.
Step 4: Installing the Ceiling Mount
With your pilot holes ready, it’s time to mount the ceiling bracket. Secure the mount with screws, ensuring it’s level and firmly attached. This is where you channel your inner Bob the Builder—can you fix it? Yes, you can! Use a level to double-check your work, because nobody wants a lopsided movie night. For a step-by-step guide, check Rank Projectors.
Step 5: Attaching the Projector
Now, for the grand finale: attaching the projector. Carefully secure the projector to the mount, ensuring all screws are tightened and the projector is stable. This is where you might need a second pair of hands—preferably someone who owes you a favor. Adjust the projector’s angle and position to align with the screen. For more on securing your projector, see Devices Mag.
Step 6: Cable Management
With the projector in place, it’s time to tackle the spaghetti monster—cables. Use a cable management kit to keep everything tidy and out of sight. This step is crucial for maintaining the aesthetic appeal of your setup and preventing any accidental trips. Remember, a clean setup is a happy setup. For cable management tips, visit Mount-It!.
Step 7: Testing and Adjustments
Finally, it’s time to test your handiwork. Power up the projector and check the image alignment and focus. Adjust as necessary to ensure the picture is as crisp as your favorite potato chips. This is your moment to shine—like a director on opening night. For testing tips, see NextTools.
Step 8: Safety and Final Adjustments
Once everything is set up, perform a final safety check. Ensure all screws are tight and the mount is secure. Safety straps can provide extra peace of mind, especially if your projector is particularly heavy. Remember, it’s all fun and games until someone drops a projector. For safety tips, visit Home Theater Review Pro.
By following these steps, you’ll have your projector mounted securely and ready for movie marathons, epic gaming sessions, or even those dreaded work presentations. Just remember to keep the popcorn flowing and the projector steady!
Cable Management and Final Adjustments for Ceiling-Mounted Projectors
The Art of Concealing Cables
While the previous section on cable management focused on using kits to keep cables tidy and out of sight, this section will delve into the art of concealing cables through creative and aesthetic solutions. Imagine transforming your ceiling into a sleek runway for your cables, where they strut their stuff without tripping anyone up or looking like a tangled mess.
- Cable Raceways and Decorative Channels: These are the haute couture of cable management. Available in various colors and designs, they can be painted to match your ceiling or walls, ensuring your cables blend in like a chameleon at a paint store. Not only do they keep cables organized, but they also add a touch of elegance to your setup. For more on these stylish solutions, check out SoftHandTech.
- Wire Hiders and Cable Sleeves: If raceways are the runway models, wire hiders and cable sleeves are the everyday heroes. They’re easy to install and offer a neat, professional look by keeping cables bundled and out of sight. These solutions are perfect for those who want to keep things simple yet effective. Learn more about these options at NextTools.
- Adhesive-Backed Clips: For those who prefer a minimalist approach, adhesive-backed clips are the way to go. They stick to your ceiling like a cat to a sunbeam, holding cables securely without the need for drilling. This option is ideal for renters or anyone who shudders at the thought of making permanent changes to their ceiling. Mount-It! offers more insights on this method.
Ensuring Safety and Functionality
While the previous section emphasized the importance of a clean setup, this section will focus on ensuring safety and functionality in your cable management efforts. After all, we want your projector setup to be as safe as it is stunning.
- Proper Length and Placement: Measure twice, cut once—or in this case, measure twice, buy once. Ensure your HDMI and power cables are the right length to avoid any awkward stretching or sagging. A well-measured cable is like a well-tailored suit: it fits perfectly and looks sharp. For more tips on cable length, visit NextTools.
- Avoiding Cable Strain: Just like you wouldn’t want to carry a heavy bag with a broken handle, you don’t want your cables under strain. Use cable ties or clips to secure them, preventing any unnecessary tension that could lead to damage or disconnection. Remember, a relaxed cable is a happy cable. SoftHandTech provides additional guidance on this topic.
- Installing a Nearby Power Outlet: If possible, install a power outlet near your projector to eliminate the need for long extension cords. This not only reduces tripping hazards but also keeps your setup looking neat and professional. For more on this practical tip, see Dangbei.
Fine-Tuning Your Setup
While previous sections covered testing and adjustments, this section will focus on the finer details of fine-tuning your projector setup. Think of it as the final polish on a masterpiece painting.
- Aligning the Projector with the Screen: Once your cables are under control, it’s time to ensure your projector is perfectly aligned with the screen. Use the mount’s adjustment options to achieve a centered picture, and don’t be afraid to make small tweaks. Remember, perfection is in the details. Dangbei offers more tips on achieving the perfect alignment.
- Adjusting Focus and Zoom: Use your projector’s focus and zoom controls to sharpen the image and fit it within the screen’s borders. If your projector has autofocus or auto screen fit features, let technology do the heavy lifting. After all, why work harder when you can work smarter? For more on these features, visit Mount-It!.
- Correcting Keystone Distortion: Keystone distortion occurs when your projector isn’t perpendicular to the screen, causing the image to appear trapezoidal. Most projectors have keystone correction settings, allowing you to adjust the angle and achieve a perfectly rectangular image. It’s like magic, but with more buttons. Learn more about this feature at NextTools.
Testing and Final Adjustments
While the previous section on testing and adjustments provided a general overview, this section will dive deeper into the final touches that ensure your setup is not just functional but fabulous.
- Power On and Test Image Quality: Turn on your projector and view some sample media. Check that the colors, brightness, and sharpness are at your desired levels. Think of it as a dress rehearsal for your home theater’s grand debut. Dangbei offers more insights on testing your setup.
- Sound System Integration: If you’re using external speakers, ensure they’re properly connected and synced with the projector for optimal audio. After all, what’s a blockbuster movie without booming sound effects? For more on integrating your sound system, visit Mount-It!.
- Control Accessibility: Set up your remote control or wireless controls to ensure easy access to projector functions. You don’t want to be that person scrambling for the remote during a crucial scene. For more tips on control accessibility, check out NextTools.
By following these steps and adding your own creative flair, you’ll not only have a projector setup that’s the envy of all your friends but also one that’s safe, functional, and downright fabulous. So go ahead, put on your DIY hat, and transform your ceiling into a canvas for your projector masterpiece.
Conclusion
Mounting a projector from the ceiling involves a series of critical steps and considerations to ensure a secure and aesthetically pleasing installation. The research highlights the importance of assessing the ceiling’s structure and weight capacity, which is fundamental to preventing accidents and ensuring the projector remains securely in place. Choosing the right mount kit tailored to the projector’s specifications and the ceiling type is equally crucial, as it ensures compatibility and stability. Locating ceiling joists using a stud finder provides the necessary support for the mount, while clearing the installation area and adhering to safety precautions, such as using a sturdy ladder and having an assistant, are vital for a smooth installation process.
The installation steps are methodically outlined, beginning with selecting the ideal location to achieve optimal image alignment with the screen. Marking the mounting points accurately and drilling pilot holes are essential for a precise and secure setup. Installing the ceiling mount, attaching the projector, and managing cables effectively contribute to a professional and tidy appearance. The research emphasizes the importance of testing and making final adjustments, such as aligning the projector, adjusting focus and zoom, and correcting keystone distortion, to ensure the best viewing experience. Additionally, integrating a sound system and ensuring control accessibility enhance the overall functionality of the home theater setup.
The implications of this research suggest that with careful planning and execution, a ceiling-mounted projector can transform a living space into a dynamic home theater environment. Future steps could involve exploring advanced cable management solutions and integrating smart home technology for enhanced control and automation. By following these guidelines and leveraging resources such as Easy Tech Solver, NextTools, and Mount-It!, individuals can achieve a safe, functional, and visually appealing projector installation.