
Side Release Buckle Sizes Explained: How to Match Buckle Width, Webbing, and Application

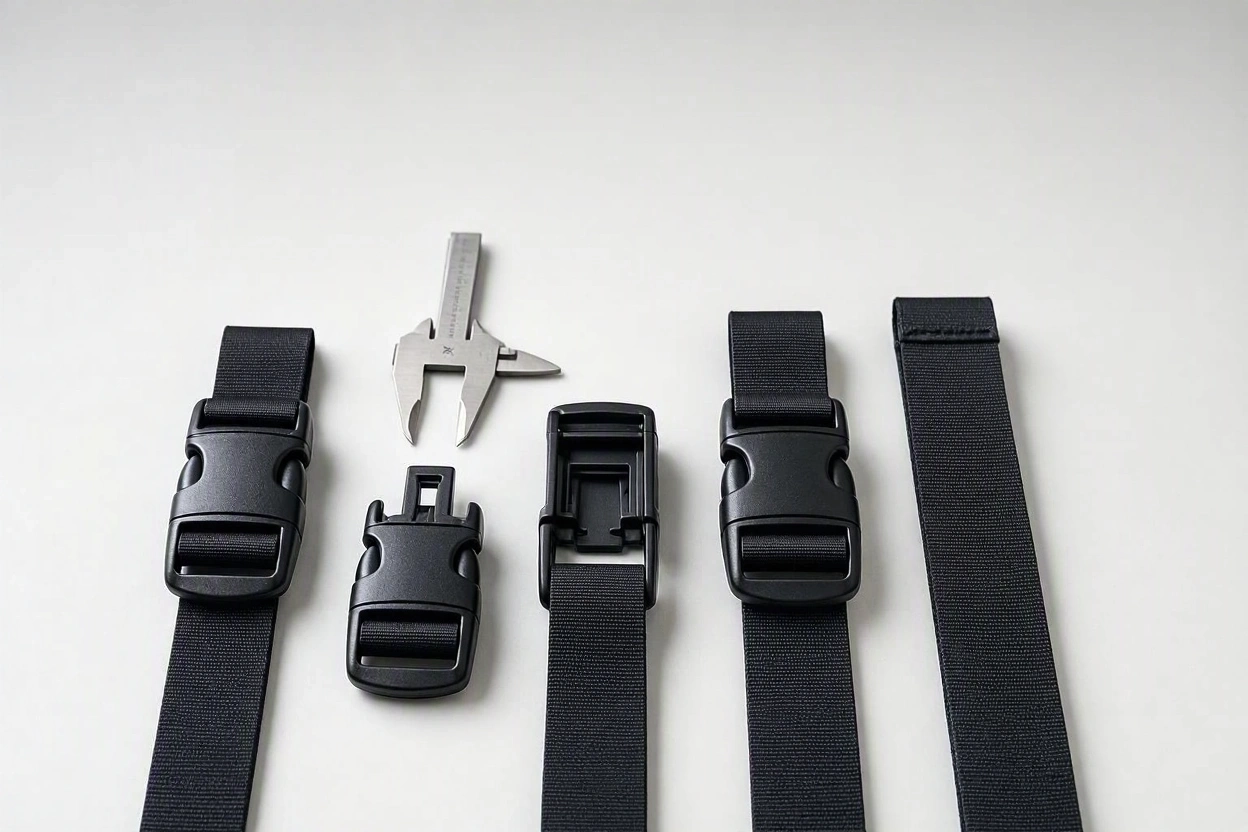
A buckle marked “1 inch” is a sensible starting point for 1-inch webbing. It is not, by itself, proof that the finished strap assembly will fit or perform as intended. Webbing thickness, slot geometry, adjustment method, and the way the two buckle halves engage all matter.

Use the size label to shortlist candidates. Then check the actual webbing, the buckle drawing, and an assembled sample before approving a part for production.

What Does a Side Release Buckle Size Mean?

The stated size generally identifies the nominal webbing width the buckle is intended to accept. It does not describe the buckle’s overall outside width or length.

Metric and inch labels are often rounded naming conventions. They should not be treated as exact conversions:

Inch labelExact conversionCommon metric label
3/8 in9.5 mm10 mm
5/8 in15.9 mm16 mm
3/4 in19.1 mm20 mm
1 in25.4 mm25 mm
1½ in38.1 mm38 mm
2 in50.8 mm50 or 51 mm

These are common labels, not a promise that every buckle in a row fits every webbing sold under that label. Check the dimensions and intended webbing width of the specific model.

Check the Webbing That Will Be Used in Production

Start with a sample of the actual webbing, rather than relying only on its catalog description. Measure its width at several points and check the thickness of the section that will pass through the buckle. Weave, coating, edge finish, and production tolerances can affect fit.

Also decide what the strap needs to do. Will the webbing be fixed after sewing, or must it move through an adjustment slot? A fit that allows convenient adjustment may not hold the strap in the same way as a fixed assembly. Evaluate the buckle together with the planned threading and stitching method.

Compare the Sample With the Buckle Drawing

Review the manufacturer’s drawing for each webbing slot or channel used in the assembly. Confirm that the webbing can be threaded without binding, excessive folding, or unwanted side-to-side movement. If both buckle halves attach to webbing, check both sides.

The male and female halves also need to engage and release as designed. Use the matched components specified for the model; do not assume that halves from different designs or suppliers are interchangeable because their nominal widths match.

Test a Complete Assembly

For example, a designer using nominal 25 mm webbing might shortlist a buckle labeled 25 mm or 1 inch. The next step is to thread the production-intent webbing through a sample, assemble the strap, and check:

  1. Whether the webbing fits and follows the intended path.
  2. Whether adjustment is smooth, or the fixed strap remains in place as required.
  3. Whether the two buckle halves engage fully and release predictably.
  4. Whether the assembly performs under the load direction and conditions expected in the finished product.

Buckle width alone does not establish a load rating. Where failure could affect safety or essential equipment, define the applicable performance requirements and obtain model-specific test information before approval.

Match the Checks to the Application

An everyday bag may place greater emphasis on comfortable operation and easy strap adjustment. A pet product may require particular attention to the assembled fit, edges, and unintended release. Outdoor equipment may also need evaluation after exposure to the temperatures, moisture, sunlight, and wear expected in use.

These considerations guide testing; they do not assign a particular application to a particular buckle width. Two buckles with the same nominal size can have different shapes, materials, and operating characteristics.

What to Send a Buckle Supplier

A useful request includes the nominal and measured webbing width, webbing thickness and construction, the planned threading or sewing method, the application, expected loading direction, environmental conditions, and any requirements for color or appearance. Ask for the drawing and samples of the proposed model, then verify them in the intended assembly.

For buyers comparing available styles and widths, Shin Fang’s side release buckle range provides a starting point for identifying candidate models. The final choice should be confirmed against the selected model’s specifications and a production-representative strap assembly.
5 Things You Need To Know About Injection Molding

To know more about injection molding? In addition to the basic introduction to injection molding, this article also analyzes the advantages, disadvantages, and application scope of injection molding. The most important thing is that this article teaches you how to save injection molding costs for your company. If you are facing whether to use injection molding process production, you must read it.

1. What is injection molding?

Injection molding instructions:

Injection molding is the most commonly used process for producing plastic parts which are mainly accomplished by melting plastic at high temperature and injecting it into a mold. The plastic injection molding process is suitable for mass production of the same plastic product in a short period of time.

Common materials for injection molding:

Injection molding materials include thermoplastic, thermoset plastic, elastomer, or metal-based materials, and the most commonly used are thermoplastic and thermoset polymers. High-performance plastics that can withstand high temperatures are gradually replacing traditional plastics.

2. What are the steps of injection molding?

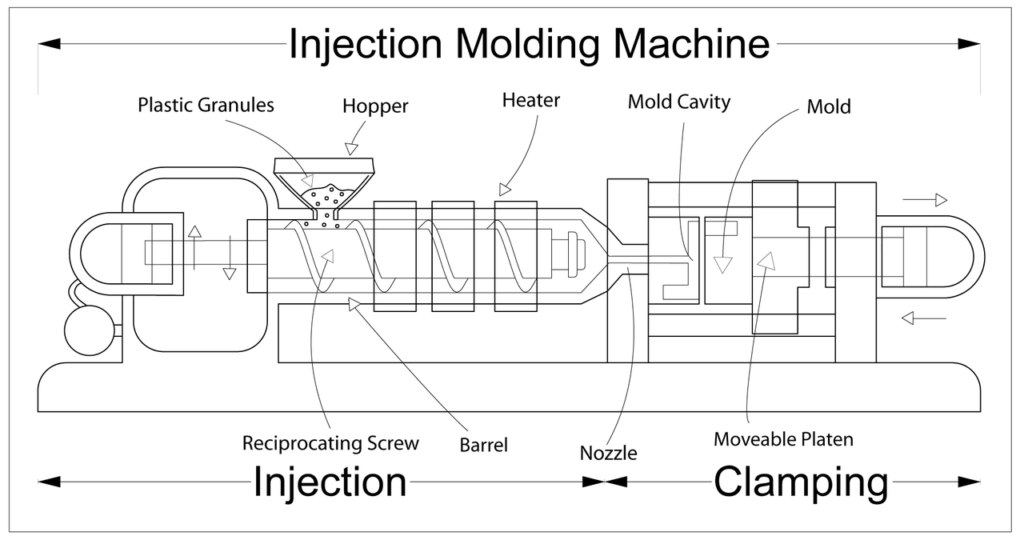
Image from:https://easchangesystems.com/application/plastic-injection-molding/

1. Plasticization

The plastic material of injection molding is usually granular, which needs to be heated at a high temperature so that the raw materials can melt in the material tube.

2. Injection Filling

The heated plastic is filled into the mold through the screw.

3. Pressurization

In order to avoid the backflow of the raw material, when the raw material is filled into the mold, the space in the mold will continuously be pressurized to ensure the compactness of the raw material filling.

4. Cooling

After the mold is filled, the injection part needs to cool down, and the cooling time depends on the type of plastic used and the thickness of the part. Each mold is designed with internal cooling or heating lines, and water circulates through the mold to maintain a constant temperature.

5. Ejection

After cooling down the mold, the ejector pin on the mold will push the product out of the mold.

3. What is the applicable scope of injection molding?

The application range of injection molding can be mainly divided into six categories:

1. Food and Beverage:

When it comes to injection molding, the food and beverage industry relies on plastic materials to manufacture product packaging and containers, and different types of injection-molded food containers such as plastic cookie mold. So, components used in food and beverage processing equipment must meet safety guidelines including BPA-free, FDA-certified, non-toxic, and GMA safety regulations.

2. Auto parts:

Many parts of modern automobiles have turned to plastic injection molding for development, planning, and manufacturing. Auto parts by automotive injection mold technique, plastic injection molding to accomplish through standardization and modularization, the development of molds can be more cost-effective, and automobile parts can also be produced more quickly and consistently.

3. Medical and pharmaceutical:

Because many medical products must be shatterproof, non-porous, and perfectly shaped, medical plastic injection molding is critical for medical and pharmaceutical production. As a high-volume producer, the medical industry can benefit from the reduced production time and affordable production materials of injection molding, while still obtaining high-quality medical-grade products. Medical and pharmaceutical parts manufactured using injection molding range from medicine bottles to X-ray assemblies.

4. Household items:

With a simple trip to your kitchen, you have a good chance of finding household injection moldings or parts. From Tupperware to building materials used in construction, there’s no denying the industry wouldn’t be what it is today without injection molding. Through the production method of plastic household mold molding, household products can be made more affordable and more diverse.

5. Agriculture:

The choice of reinforced plastics is favored due to new plastic material properties such as UV resistance, impact resistance, moisture resistance, etc. The ability to produce durable products that can stand up to the elements of the farm makes plastic injection molding clearly suitable for agriculture, from feeding troughs to specialized harvesting components.

6. Electronic products:

While many people think of electronic components as metal mechanical parts that run primarily on electricity, improving system longevity with a corrosion-resistant plastic enclosure improves overall performance. As you might have guessed, manufacturing the case via a plastic electronic injection molding process is preferred. The computer mouse you’re probably using right now, as well as the TV in your living room, probably has some components that are injection molded from plastic.

4. what are the advantages and disadvantages of injection molding?

advantage:

1. Low Scrap Rates with Injection Molding

Injection molding produces lower scrap rates compared to traditional manufacturing processes such as CNC machining, which cut away most of the original plastic block or sheet.

2. Each product is Consistency

Injection molding ensures consistency in every part produced, as one of the characteristics of plastic injection molding.

Drawbacks:

1. Small design errors will cause big costs with injection molding

The early stage of development costs a lot because of testing, tooling requirements, and the mass-produced parts quantity requirement from the manufacturer. All you need to do is to make sure you get the design right the first time.

2. Be Ready for High Tooling Costs for Injection Molding

When you develop a mold up front, you have to design the part and make a prototype, you have to design a mold that can mass-produce replicas of the part and make a prototype. Finally, after extensive testing in the two stages above, you can inject mold apart. However, you need to be ready It might cost more money in the process.

5. How to save the cost of injection molding for yourself?

1. Consider the injection part size

The amount of material should be reduced as much as possible, cause unnecessarily large parts or features add not only a monetary cost but also a time cost.

2. Design for manufacturability analysis

Finding an experienced partner or mold maker can save you a lot of time and money in the long run. Identifying issues such as impossible geometries, insufficient draft angles, and moldable features at an early stage will eliminate financial and cosmetic expenses along the way.

3. Intelligent mold design

You can save money by partnering with a molder who designs molds intelligently. How your part is positioned in the mold can have a major impact on cost. Correct part positioning optimizes how molds are filled and reduces scrap.

4. Modify your mold

Reduce costs by modifying molds rather than buying a brand-new mold for every modification. With design tool inserts, you can shape various versions and functions.